Advertisemnet

Earn Extra Money At Home. Starting from Now!!!

Thursday, March 29, 2012

Android Chapter 7 : Loading Screen

Hello everyone, welcome to Android Chapter 7 : Loading Screen.
It's mihiran again. In this chapter we are going to look, how to create a simple loading screen in android.

So lets get started.

Loading screen is a very useful feature to give a professional look to your app. In my application I'm using it in several places.. First look at it and how nice it is..

                       Starting                                          Login                                           Log off


In my case I'm using a Thread to handle this. Coding part is very simple. When your are using thread, you must have to surround it by try catch block. Lets see how I have used it in my Starting page.

package com.solution.dude;
public class SolutionDudeActivity extends Activity {
/** Called when
the activity is first created.
**/
@Override
public void onCreate(Bundle savedInstanceState) {
super.onCreate(savedInstanceState);
final ProgressDialog pd.new ProgressDialog(this);
pd.setProgressStyle(ProgressDialog.STYLE_SPINNER);
pd.setMessage("Loading ...");
pd.show();
setContentView(R.layout.main);
new Thread(new Runnable() {
public void run() {
try
{
Thread.sLeep(2000);
pd.dismiss();
}
catch
(InterruptedException e) {
e.printStackTrace();
}).start();

You have to have a runnable thread here. Otherwise it won't work properly. I want to pop up the loading screen for two seconds. That is why I'm using 2000 here.
You can have a object from ProgressDialog class and set the style, message and many more. In here I'm using progressDialog.STYLE_SPINNER. If you use progressDialog.STYLE_HORIZONTAL you'll see it like below.


And that's it.
See you in the next chapter again !
Android

Android Chapter 6 : Passing Values

Hello everyone, welcome back. This is Android Chapter 6 : Passing Values. I'm Mihiran Rupasinghe. As I said earlier today I'm going to show you how you can pass values from one activity to another.

Its very simple.

I think you remember this code.


Button btn.(Button)findViewById(R.id.btnStart);
btn.setOnClickListener(new OnClickListener() {
public void onClick(View v) {

Intent intent = new Intent(SolutionDudeActivity.this,Login.class);
startActivity(intent);
});


When I press the START button in my main page, I can move to the Login screen. 

Now think, I want to display my name in welcome screen when I logged in to the application. I'm using putExtra and getExtra methods. All I want to do is modify the code like below.

Intent intent = new Intent(Login.this,Welcome.class);
intent.putExtra("user", name.getText().toString());
startActivity(intent);

You can use "putExtra" method to pass values. First parameter is to identify what you are passing. In here I'm getting the string value of EditTextBox and pass it to welcome screen. I have to do one thing. That is change the code of Welcome.java to catch the passed value.

package com.solution.dude;
import android.app.Activity;
public class Welcome extends Activity {
@Override
protected void 
onCreate(Bundle savedInstanceState)

super.onCreate(savedInstanceState);
setContentView(R.layout.weLcome);
TextView tv.(TextView)findViewById(R.id.user);
tv.setText("Hello " + getIntent().getExtras().getString("user") + ",");

I have a textview called user and Log out button at top of my Welcome.xml.
And the output will be appeared like this.


And that's it.
Next chapter we'll look at how to create a simple loading screen..
See you in the next chapter.

Tuesday, March 27, 2012

Android Chapter 5 : Web Services in Android (WCF) Part 2

Hello everyone, welcome back to Web Services in Android (WCF). This is Android Chapter 4 : Web Services in Android (WCF) Part 2. I'm Mihiran Rupasinghe. In previous chapter http://androidplusiphone.blogspot.com/2012/03/android-chapter-4-web-services-in.html we looked at how to create a web service in ASP.NET with SQL database.  Now lets see how to connect our android application with our web service.

Since I'm using "SoapSerializationEnvelop" to use web services in my app, I must have a special jar file called "ksoap2-android-assembly-2.5.2-jar-with-dependencies.jar". you can download it from here. Go to this link and click "View raw file". Then you can download the file. http://code.google.com/p/ksoap2-android/source/browse/m2-repo/com/google/code/ksoap2-android/ksoap2-android-assembly/2.5.2/ksoap2-android-assembly-2.5.2-jar-with-dependencies.jar?r=498

Then copy the file in to this directory. "C:\Program Files\Android\android-sdk\platforms\android-10". Now you are done with that.

Now go to the android project in eclipse. Right click the project and go to properties. Select "Java Build Path", select "Libraries", click "Add External JARs", select the .jar file and press ok.


Ok. Now you have to give INTERNET permission for your app. To do that, in your manifest file write the uses-permission tag like this at bottom.

</application>
<uses-permission android:name="android.permission.INTERNET"/>
</manifest>

 Now I go to Login.java file which is going to access remote database. Import these headers.

 import org.ksoap2.*;
 import org.ksoap2.serialization.*;
 import org.ksoap2.transport.*;


Then I modify the file like below. In here, to connect to the web server I'm using "SoapSerializationEnvelop" and "HttpTransportSE" classes.

public class Login extends Activity {

private static final String SOAP_ACTION = nhttp://tempuri.org/memberValidation";
private static final String METHOD_NAME = nmemberValidationn;
private static final String MAMESPACE = "http://tempuri.orgr;
private static final String URL = nhttp://10.0.2.2:8833/WebService/Service.asmx";

EditText name;
EditText pass;
TextView tv;
 
@Override
protected void onCreate(Bundle savedInstanceState) 
{
super.onCreate(savedInstanceState);
setContentView(R.layout.Login);
name.(EditText)findViewById(R.id.txtname);
pass.(EditText)findViewById(R.id.txtpassword);
tv.(TextView)findViewById(R.id.txtError);
Button btnSignIn.(Button)findViewById(R.id.htnsignin);
btnSignIn.setOnClickListener(new OnClickListener() {
public void onClick(View v) 
{
SoapObject Request = new SoapObject(NAMESPACE, METHOD NAME);
Request.addProperty("name" , name.getText().toString());
Request.addProperty("passwd", pass.getText().toString());
SoapSerializationEnvelope soapEnvelop;
soapEnvelop = new SoapSerializationEnvelope(SoapEnvelope.VER11);
soapEnvelop.dotNet = true;
soapEnvelop.setOutputSoapObject(Request);
HttpTransportSE htp = new HttpTransportSE(URL);
try{
tv.setText("");
htp.call(SOAPACTION,soapEnvelop);
SoapPrimitive resultString = (SoapPrimitive)soapEnvelop.getResponse();
String id = resultString.toString();
Intent intent = new Intent(Login.this,Welcome.class);
startActivity(intent);
catch 
(Exception e){
tv.setText("Invalid details. Please check again!");
});

This is the most important part.
The four string in above are defined according to your web service web page.

SOAP_ACTION -

METHOD_NAME - your method name (" memberValidation ")

NAMESPACE - "http://tempuri.org/"

URL - replacing 'localhost' by '10.0.2.2' .

And also, I'm using a textview for error message. If user is not valid it gives an error message.

Important :
The first parameter name of Request.addProperty method should be equal to parameter name in memberValidation method. Otherwise it won't work.

If everything is fine user redirect to the welcome page.
Run it in emulator and see how nice it is.
Make sure your web service is running..


Congratulation !
We are done with the web services in our app.

In my next chapter I'll explain how to pass a value from one activity to another.
See you in the next chapter.

Android Chapter 4 : Web Services in Android (WCF) Part 1

Hello everyone, welcome back. This is Android Chapter 4 : Web Services in Android (WCF) Part 1.
I'm Mihiran Rupasinghe. And today we are going to look at a very important part in android. That is how to use web services in android.

First of all, I have to tell you, there is no any hard part here.. Its very simple.

In here, I'm going to use ASP.NET web service in Microsoft Visual Studio 2008 and Microsoft SQL server 2008. I'm going to show you how it works with remote database that can be accessed from anywhere in the world.

So lets get started !

First I created a database called SolutioDude. After that I created a table called member and inserted some values shown as below.


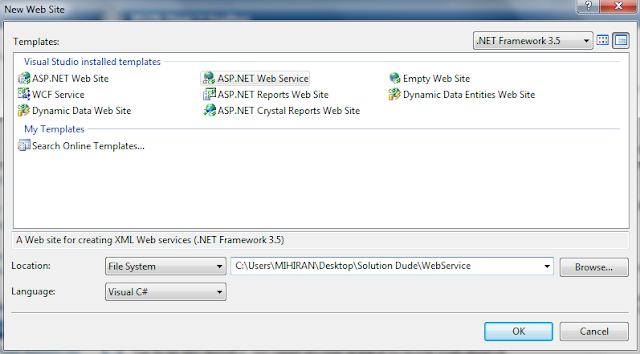
Ok. Now open visual studio and select File > New > Web site. And choose ASP.NET Web Service. Give a path where you can store the web service, select the language as Visual C# and press OK.


Now you have to modify connection string in your web.config file according to your configurations.
My one is shown below.

<connectionStrings>
<add name="ConStrine"
connectionString="Data Source=MIHIRAN-PC;
Initial Catalog=SolutionDude;
Trusted_Connection=true;
User ID=; Password="
providerName="System.Data.Sg1Client"/>
</connectionStrings>


Now I add a class called Member to the project. And I add a method called member which accept two parameters (name and password) and return a string value (id). What i'm going to do actually is when user submit the user name and the password, if he is a valid user he can enter the application. Now I modify that method I created like shown in below to connect and retrieve the values from SQL database.


Now i'm going to modify my Service.cs (default class) file like shown in below. memberValidation method will call the member class object and return id. If id have some value, then it is a valid member.


Now you have to do only one thing to publish the web service. It is attach the database to web service.
First go to sql server and detach your database. Then come to your web service project in visual studio and right click "App_Data" folder in solution explorer and select "Add existing item" and select your database file (with log file) My database files are stored in this location "C:\Program Files\Microsoft SQL Server\MSSQL10.MSSQLSERVER\MSSQL\DATA" .

After that go to SQL server again and attach the database to sql server.
OK. Now you are done with the web service. To test the web service run the Service.asmx file.

The method which I created in Service.cs file should be shown in top of the page.
Then click the method.

Then you can see the parameters of our memberValidation method are waiting for inputs. Give a valid user name and a password. According to my database I'm giving "mihiran" as user name and "123" as password.
And press "Invoke". If everything is fine you should be able to see a xml file holding your return value (id) like shown below.


Congratulations !
Now you are done with the Web service.
But we we have another part. That is connecting the android application with this web service.

We'll see it in next chapter.

Android Chapter 3 : Calling Another Activity

Hello everyone, welcome back. This is Android Chapter 3 : Calling Another Activity.
I'm Mihiran Rupasinghe. Today we'll see how to call an activity from another activty. That means how you can move from one screen to another.

To do that you have to create an object from "Intent" class. When you create the object you have to give caller and who is going to called. In my main screen, when I press the start button I want to go to Log In page. To do that, first I have to write the code for button click. In my main activity java file, I'm going to write like this.


"btnStart" is the id of START button. SolutionDudeActivity is the caller and Login is the activity which is going to called. Now you should be able to go to Login Page when you press the START button.

See you in the next chapter.

Android Chapter 2 : Customize Buttons

Hello everyone, welcome back. This is Android Chapter 2 : Customize Buttons.
I'm Mihiran Rupasinghe. Today, we'll see how you can customize your application buttons as you wish.

In order to customize your buttons will have to have xml files in "Drawable" folder and images in your "Drawable-hdpi" folder. You can create xml file like this.

1. click the button "Open wizard to help create a new Android XML file".
2. Select 'Drawable' in Resource Type.
3. Select your project and give a suitable name.
4. Select 'selector' for the root element.

Now you have a XML file like this.


You have to modify it like this.


"btnpressed" and "btndefault" are my images (.png) which are in Drawable-hdpi folder. And you can call the xml file in your layout. Coding of my "Sign In" button in Sign In page is shown below. (with my two images buttons)


"btn" is my xml file which is in Drawable folder.

See you in the next Chapter.

Android Chapter 1 : Creating Layouts

Hello everyone, welcome back. This is Android Chapter 1 : Creating Layouts.
I'm Mihiran Rupasinghe. Today we'll see how you can layouts in android.

To create layouts first you have to create xml file in your layout folder.

1. click the button "Open wizard to help create a new Android XML file".

2. Select 'Layout' in Resource Type.
3. Select your project and give a suitable name (cannot start in capital).
4. Select your layout type for the root element (Linear Layout is recommended).

Now you can see the created xml file in layout folder.

Now you have to create a class for your xml file in "src" folder.

Give a name to your class ( it is good if you can give the same name in xml file )
In Superclass section select brows and type Activity and select "Activity - android.app". click OK.

Click finish.

Very important. When you create an Activity you must have to define it in manifest file like this.


We are almost done. Only thing we have to do now is set the layout to the class. First clean and build your project. Then the id of xml file will be added to R.java file. Open your class file. Inside Activity, type "onCreate" and press 'Ctrl' and 'space' together. Then select the first option, 'onCreate(Bundle savedInstanceState)'. And modify like below.


You are done !.

Most of the beginners is having this problem how to use layout appropriately. I'm going to show you how to use Linear Layout in applications. That is the most suitable way to use layouts.

                     Main Page                                   Log in Page                              Registration Page


In here, all the layouts are done by using linear layouts. Its very simple. Technique is I have use Linear layouts (horizontal) inside of Linear layout (vertical). You can set the background like shown in below. "@drawable/background" means I have an image called 'background' in my drawable-hdpi folder. Sample code of Sign In page is shown below.


See you in the next Chapter.

Introduction ( Android )

Hello everyone,

This is a project of two students of 3rd year Software Engineering batch in Sri Lanka Institute of Information Technology in 2012. This blog will be showing the process of creating this mobile application called "Solution Dude". Android part will be covered by my self (Mihiran Rupasinghe) and IOS part will be coverd by Tharindu Edirisinghe. Android part is done by using Eclipse Indigo and Java language.

See you in Chapter 1.